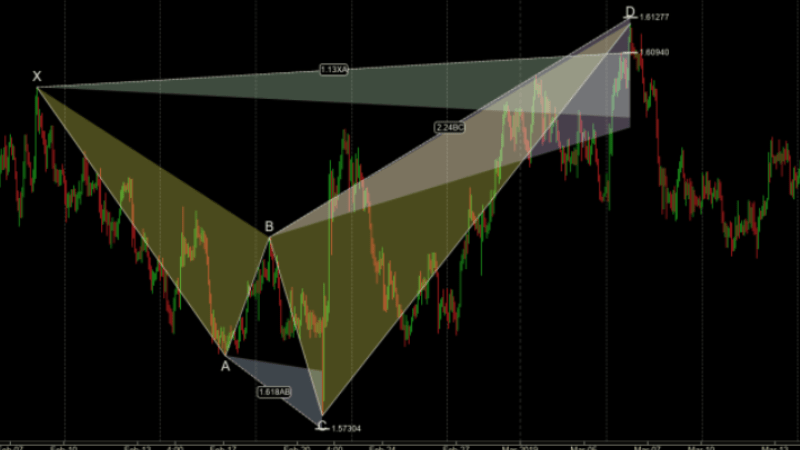
The Shark pattern is a relatively newer discovery within the harmonic trading arena. It has a very distinct appearance, and specific Fibonacci relationships that compose the overall structure. In this article, we will be discussing all aspects of the Shark trading pattern.
Harmonic Shark Pattern
The Shark pattern is a chart formation that is classified within the harmonic family of patterns. It was introduced to the trading community by Scott Carney, who has done extensive research into Fibonacci-based harmonic patterns including the Bat, Gartley, and Crab patterns.
As with other harmonic patterns, the Shark pattern exhibits a very specific set of Fibonacci relationships within its structure. As for the labeling convention for the Shark pattern, it differs a bit from the traditional labeling convention seen within most harmonic patterns. More specifically, the five points within the Shark pattern are labeled as 0, X, A, B, and C. This is in contrast to many other traditional harmonic patterns that are generally labeled as X, A, B, C, and D.
The main take away from this is that the terminal point within the Shark pattern should be recognized at the end of the BC leg, rather than the end of the CD leg as is common with most other harmonic structures. Many traders often confuse the Shark pattern with the Cypher pattern. While both of these patterns are harmonic formations, and have certain similarities between them, there are some distinct differences between the two that we will be reviewing a bit later on.
Upon drawing the harmonic Shark pattern, you will notice a few important features. As far as the general appearance, many traditional technical analysts may recognize the pattern as a double top formation upon the pattern completing the B point within its structure, in the context of an up trending market phase.
Similarly the Shark pattern appears as a double bottom formation upon the pattern completing the B point within its structure, in the context of a down trending market phase. This is a fairly general description of the harmonic Shark pattern. We will be looking at the very specific Fibonacci proportions within the structure next. Although it is not required, a Shark pattern indicator will help in outlining the structure.
Below you can see an illustration of the bullish variety of the harmonic Shark pattern.
As we can see, the Shark pattern is a five point formation with four primary legs. The formation starts at point 0 and ends at point C. Below is a detailed description of each swing within the bullish Shark pattern.
OX price leg – This is the first leg within the structure. Price travels higher from point 0 to point X, and this price move appears to be impulsive in nature, meaning that it has characteristics of a trending price move.
XA price leg – This is the second leg within the structure. After point X reaches its peak, the XA leg retraces a portion of the initial upside price move. While there is no specific retracement level for the XA price leg it must be less than a 100% retracement of the initial price move.
AB price leg – The AB price leg is the third leg within the structure. After point A has completed price begins to move higher within the AB leg. Eventually this price move extends beyond the swing high seen at point X. Ultimately, the AB leg will be a 113% to 161% extension of its prior XA swing.
The BC price leg – This is the final leg within the structure. Starting from point B, the price action begins to move lower in an impulsive type of move. The price should travel approximately 161% to 224% the length of the XA leg.
Additionally the terminal point within this pattern occurs at point C, which will fall between the 88.6 and 113% retracement of the initial 0X price swing. At this point, the structure is considered to be completed, and a bullish price move should ensue from this terminal C point.
The Shark pattern can be seen as a type of exhaustion pattern. Within the context of a bullish Shark pattern, price makes a move to the to the upside which later leads to a sharp price decline that ultimately gives back most if not all the gains seen within the structure. And just when traders are convinced that a new downtrend is in place, a reversal is set to take place at point C which will again lead to a bullish impulse leg.
In our example here we have discussed the bullish variety of the Shark pattern, but it’s important to note that the Shark pattern can occur as a bearish variety as well. In this case, the pattern would be inverted.
Bullish Shark Pattern
Let’s quickly recap the primary fib ratios for the Shark pattern, and consider some trade management rules for the bullish variety of the pattern.
OX price leg – This is the initial bullish impulsive price move.
XA price leg – This leg retraces a portion of the initial OX leg
AB price leg – This leg extends beyond the swing high at point X. Point B should terminate within the range of 113 to 161% of the XA leg.
BC price leg – As price moves lower, point C should terminate at a level that corresponds to 161% to 224% projection of the XA leg. Additionally, point C should retrace to 88% to 113% of the OX leg.
Now, there are several different ways that harmonic traders will trade the bullish shark pattern. As such, there is no universal method for trading this pattern. Below are some of the more traditional trade management rules for the bullish Shark pattern.
Enter a limit order to buy between the 88% and 113% retracement level of the OX leg.
Place a stop loss at the 127% extension of the OX leg.
Utilize a dual target scale out exit approach, with the initial target set just below point A of the pattern. The second target will be set just below point B of the pattern.
If you refer to the illustration of the bullish Shark pattern above once again, you can see where these levels would trigger within the pattern structure.